Creating a Kubernetes Cluster using kubeadm: A Step-by-Step Guide

In this tutorial, I will walk you through the process of creating a Kubernetes cluster using kubeadm.
We will set up a cluster with one master node and two worker nodes.
Prerequisites
Three linux VMs ( Ubuntu/Debian ) with the following configuration:
- RAM: 2GB
- CPU: 2
Static IP addresses assigned to each VM:
- k8s-master: 192.168.100.10
- k8s-worker1: 192.168.100.11
- k8s-worker2: 192.168.100.12
Step 1: Turn off swap on all 3 nodes
Run the following command on each VM to turning off swap:
sudo swapoff -aStep 2: Install Containerd on all 3 nodes
We will install Containerd on all three nodes.
First, set up Docker’s apt repository:
# Add Docker's official GPG key:
sudo apt-get update
sudo apt-get install ca-certificates curl
sudo install -m 0755 -d /etc/apt/keyrings
sudo curl -fsSL https://download.docker.com/linux/ubuntu/gpg -o /etc/apt/keyrings/docker.asc
sudo chmod a+r /etc/apt/keyrings/docker.asc

# Add the repository to Apt sources:
echo \
  "deb [arch=$(dpkg --print-architecture) signed-by=/etc/apt/keyrings/docker.asc] https://download.docker.com/linux/ubuntu \
  $(. /etc/os-release && echo "$VERSION_CODENAME") stable" | \
  sudo tee /etc/apt/sources.list.d/docker.list > /dev/null
sudo apt-get update
Then, install the latest version of Containerd:
sudo apt-get install containerd.ioStep 3: Enable IPv4 packet forwarding on 3 nodes
To manually enable IPv4 packet forwarding, run the following commands:
cat <<EOF | sudo tee /etc/sysctl.d/k8s.conf
net.ipv4.ip_forward = 1
EOF

sudo sysctl --system
Verify that net.ipv4.ip_forward is set to 1 with:
sysctl net.ipv4.ip_forwardStep 4: Configuring the systemd cgroup driver
Edit the Containerd configuration file on 3 nodes:
sudo vim /etc/containerd/config.toml By default SystemdCgroup is set to false, change it to true and save the file.
SystemdCgroup = true
Restart the containerd service:
sudo systemctl restart containerdStep 5: Install kubeadm, kubelet, and kubectl on 3 nodes
Update the apt package index and install packages needed to use the Kubernetes apt repository:
sudo apt-get update
sudo apt-get install -y apt-transport-https ca-certificates curl gpg
Download the public signing key for the Kubernetes package repositories:
curl -fsSL https://pkgs.k8s.io/core:/stable:/v1.31/deb/Release.key | sudo gpg --dearmor -o /etc/apt/keyrings/kubernetes-apt-keyring.gpgAdd the Kubernetes apt repository:
echo 'deb [signed-by=/etc/apt/keyrings/kubernetes-apt-keyring.gpg] https://pkgs.k8s.io/core:/stable:/v1.31/deb/ /' | sudo tee /etc/apt/sources.list.d/kubernetes.listInstall kubelet, kubeadm, and kubectl:
sudo apt-get update
sudo apt-get install -y kubelet kubeadm kubectl
sudo apt-mark hold kubelet kubeadm kubectl
Enable the kubelet service: ( Optional )
sudo systemctl enable --now kubeletStep 6: Initializing control-plane node
On Master node, run the following command to initialize the control-plane node:
Note: Make sure to give ip address of master server in apiserver-advertise-address in below.
sudo kubeadm init --pod-network-cidr=10.244.0.0/16 --apiserver-advertise-address=192.168.100.10
Note down the kubeadm join .. command.
To make kubectl work for your non-root user, run these commands on master node:
mkdir -p $HOME/.kube
sudo cp -i /etc/kubernetes/admin.conf $HOME/.kube/config
sudo chown $(id -u):$(id -g) $HOME/.kube/config
Check the status of all pods in kube-system namespace before proceeding with next step, All should be in running in state:
kubectl get pods -n kube-systemStep 7: Install Weavenet for Pod network ( Master node )
To enable networking between pods, we will install Weave Net. Run the following command on the master node:
kubectl apply -f https://reweave.azurewebsites.net/k8s/v1.31/net.yamlEdit the Weave Net daemon set to set the IPALLOC_RANGE environment variable to match the pod CIDR network:
kubectl edit ds weave-net -n kube-systemAdd the following line inside the Weave container:
env:
 - name: IPALLOC_RANGE
   value: 10.244.0.0/16
Should like below,

To verify that the Weave Net pods are running, execute:
kubectl get pods -A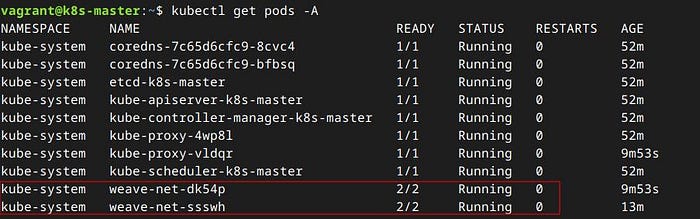
Step 8: Join Worker Nodes to the Kubernetes Cluster
On each worker node (k8s-worker1 and k8s-worker2), run the kubeadm join command that you noted earlier from the master node output in Step 6. It will look something like this:
sudo kubeadm join 192.168.100.10:6443 --token lrtikv.kkofdqr5yrpdwph2 --discovery-token-ca-cert-hash sha256:6019159ec9edb4a4739e95c845f0547aa2e11bec172795c0c75100338279f865Verify Node Status on Master Node:
After joining the worker nodes, return to the master node and run the following command to verify the status of the nodes:
kubectl get nodes
Conclusion
Congratulations! You have successfully set up a Kubernetes cluster using kubeadm with one master node and two worker nodes.